Increase security and stability of routers with OpenWRT firmware
Introduction
In connection with the transition to remote work in the quarantine era, corporate information security risks have changed their structure. For example, the risks of social engineering and phishing have increased. Earlier, as soon as the quarantine began in March 2020, we wrote about the protection against such threats.
Home routers (and access points) have turned out to be one of the weakest spots in IT security. Symantec estimates that up to 75% of IoT attacks are carried out by infected routers. Vulnerabilities in them are identified and fixed much less frequently than in corporate network equipment. Manufacturers of cheap network equipment do not pay enough attention to security.
Since employees of organizations simply transfer all their work and all confidential data to home computers, the cost of a home device compromise has increased dramatically. One of the forecasts of the most critical threats to information security in 2022 is the likely leaks of medical data from the home computers of doctors and other health workers. Critical personal data, financial information, trade secrets, confidential source codes – all of this is now massively processed at home.
Even if users work from home on secure, centrally managed corporate laptops or desktops, these home computers often lack corporate security in the form of NIPS, UTM, event monitoring, management of security patches on network equipment, and other corporate network security services.
At the same time, replacing home routers with more secure devices is fraught with unnecessary costs and investments. Recognizing the social mission of keeping corporate and home users secure in ordinary home environments, we are suggesting how to increase, using OpenWRT firmware, the security and stability of small routers used in small businesses and at home.
What is OpenWRT and how can it improve security?
As you probably know, your router is a small computer and it has software, so-called “firmware”. The firmware is developed by the router manufacturer, but there are also alternative solutions, open-source projects: OpenWRT, DD-WRT, Tomato.
What can OpenWRT give us?
- Updates (security and new features) are released several times more frequently and the tech support lasts several times longer than from most manufacturers. This has become especially important in the conditions of quarantine. Vulnerable router firmware is one of the most common causes of incidents when working remotely.
- Native firmware can be unstable, especially on cheap routers. For example, many TP-Link models freeze after several days of continuous use.
- You get used to one user interface and when you change/upgrade your router, even from another manufacturer, you feel “at home”.
- You don’t need to buy an expensive router to implement advanced features such as IPv6, parental control, ad blocking, VPN, guest WiFi, DNS encryption, dynamic DNS (DDNS), etc.
- There is an active community that will help you more quickly than even the support of a large manufacturer, and a lot of info has already been documented.
- The advantages of an open solution based on Linux: the ability to connect via SSH, automate the configuration and manage the router using scripts, settings stored in text files (automation, version control), you can use the router for other tasks (smart home, SFTP/Web server, torrent download, etc.).
These and other reasons are described in more detail at the project site.
This article will help you set up basic OpenWRT functionality so you can quickly and painlessly switch to this solution. Here is a list of these functions:
- Set the root password.
- Restrict SSH access for LAN interface only.
- Configure PPPoE WAN connection.
- Configure WiFi.
- Add guest WiFi (no access to local network).
- Configure dynamic DNS NoIP.
- Configure port forwarding.
- Save the configuration to an archive file.
Items 6 and 7 are needed, for example, in order to connect from the Internet to your home computer via SSH or SFTP (for example, to synchronize files with your laptop), as well as for direct connection via Anydesk, which works faster than the usual one.
The process of the initial OpenWRT “flashing” depends on the model of your router. Find it in the list of supported devices and follow the guidelines there.
Settings can be made using an SSH connection and scripts, but we will look at the web interface (called LuCI) as a more intuitive and resilient option.
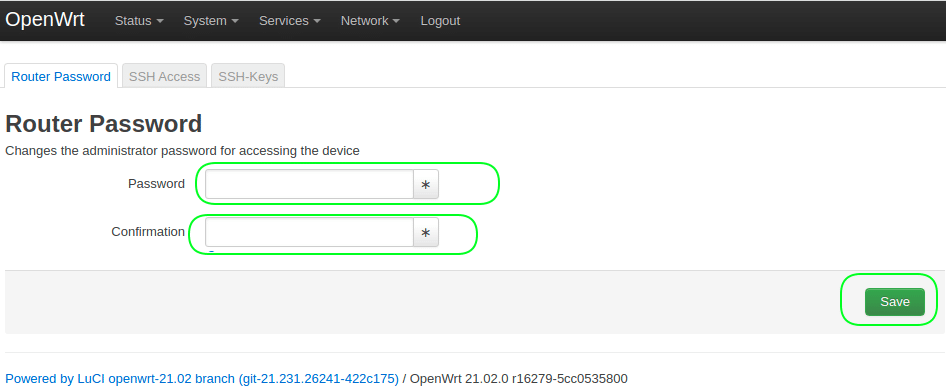
1. Set root password.
Go to the menu System > Administration.
2. Restrict SSH access to the LAN interface only.
Go to the menu System > Administration > SSH Access.
Interface = lan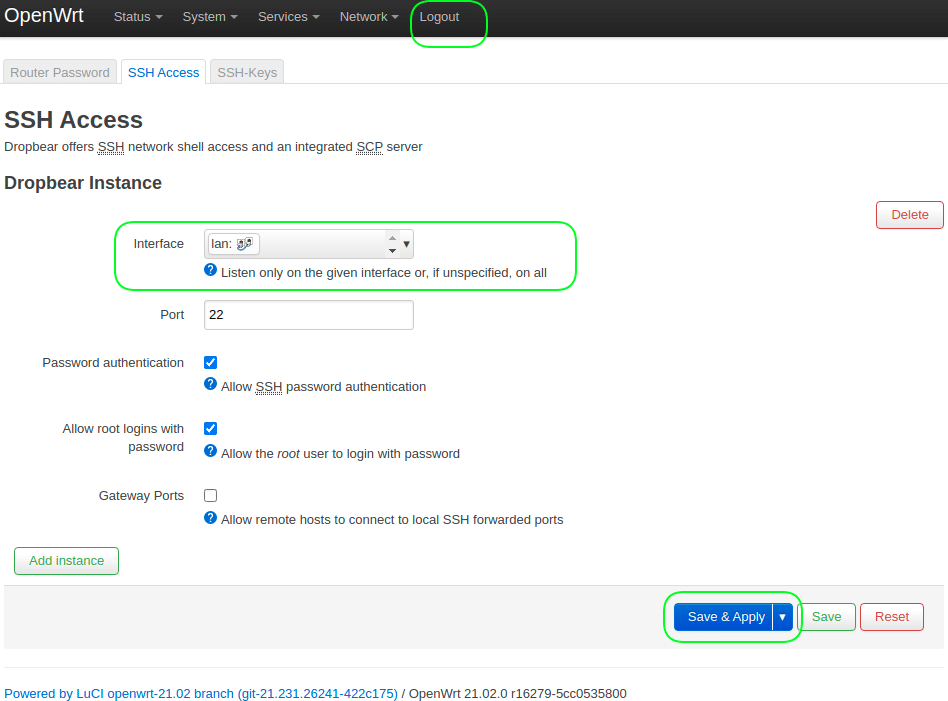
After this step, it is advisable to logout and log in again to remove the warning at the top of the screen.
3. Configure PPPoE WAN connection.
Go to menu Network > Interfaces.
Press the “Edit” button in the “WAN” line.
Protocol = PPPoE + click the button "Switch protocol"
PAP/CHAP username = your_login_with_provider
PAP/CHAP password = your_provider_password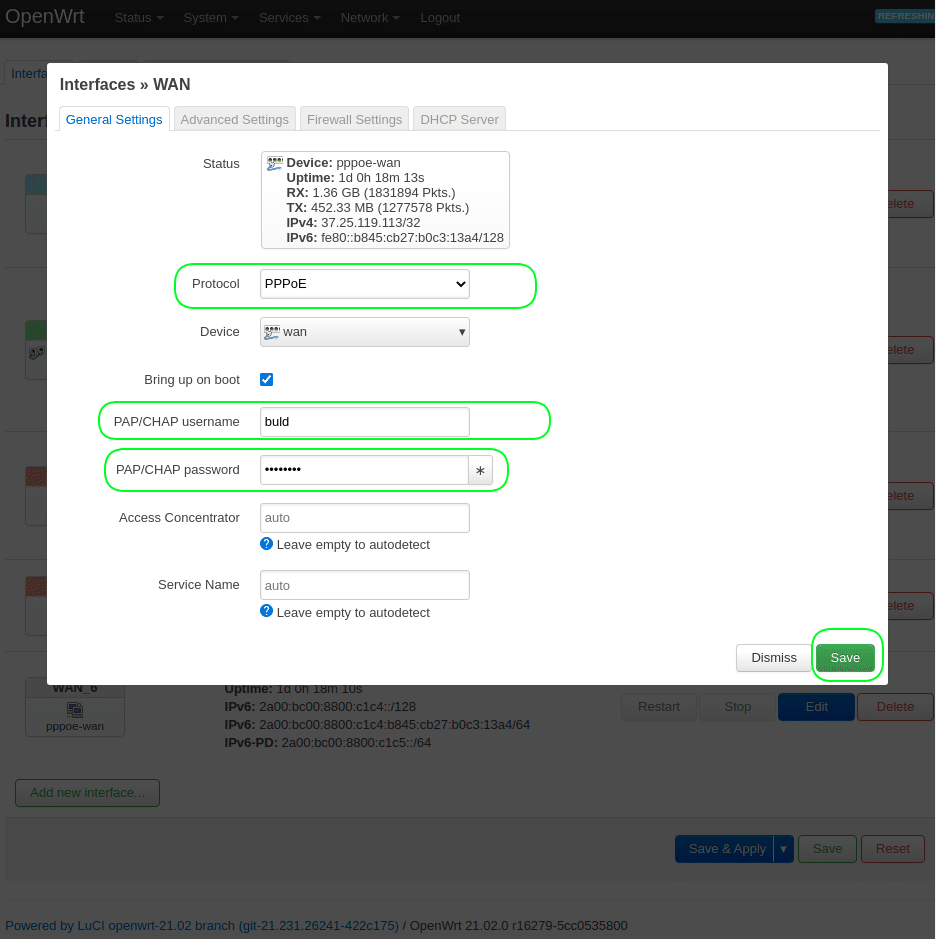
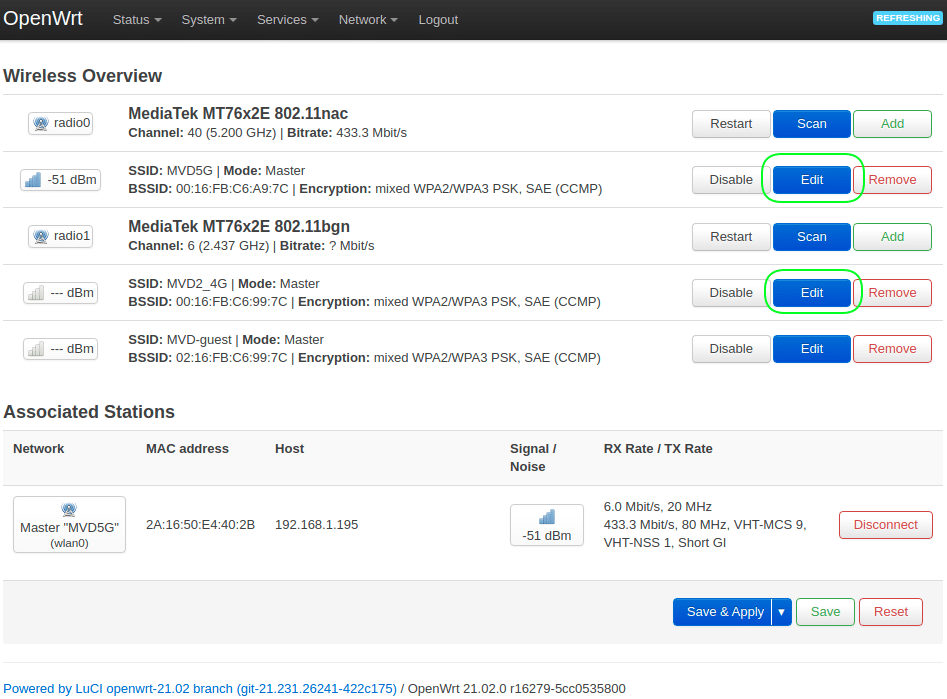
4. Configure WiFi.
Go to menu Network > Wireless.
4.1 Click the button “Edit” under “radio0 802.11nac”.
Channel = Auto
ESSID = your_5GHz_wifi_name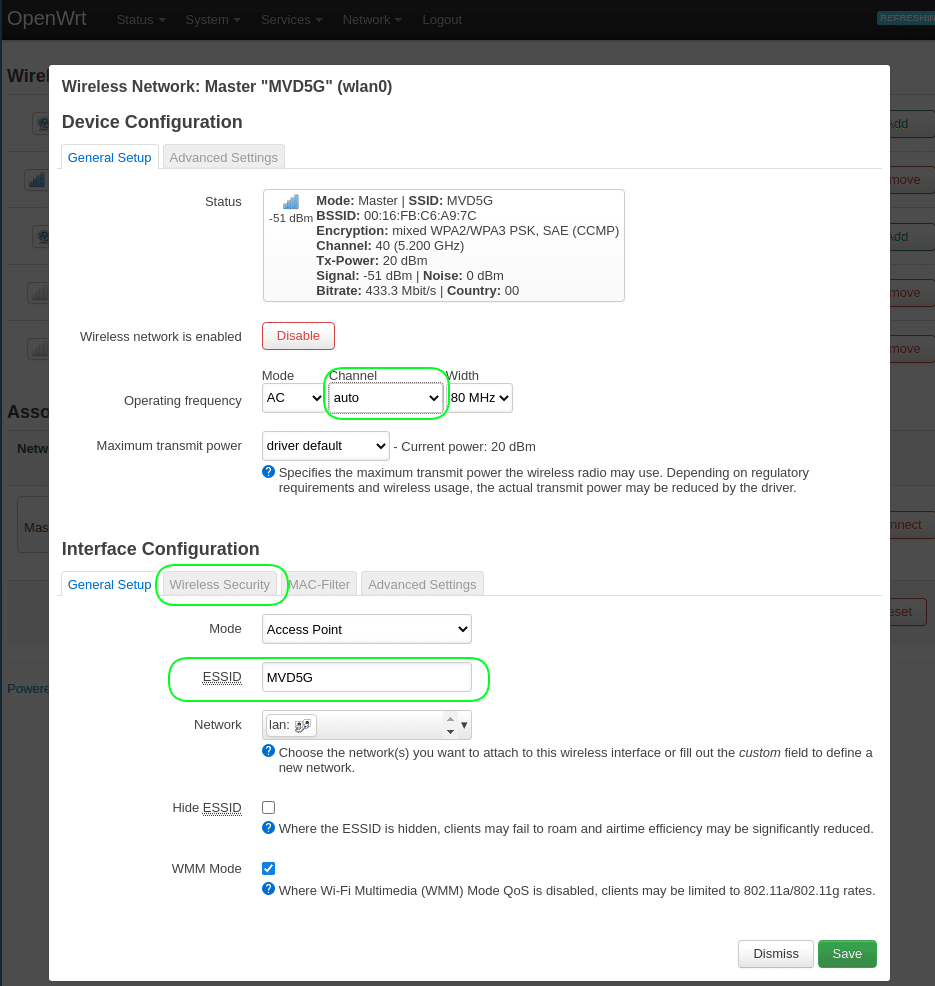
Go the tab Wireless Security.
Encryption = WPA2-PSK/WPA3-SAE Mixed Mode
Key = your_5GHz_wifi_password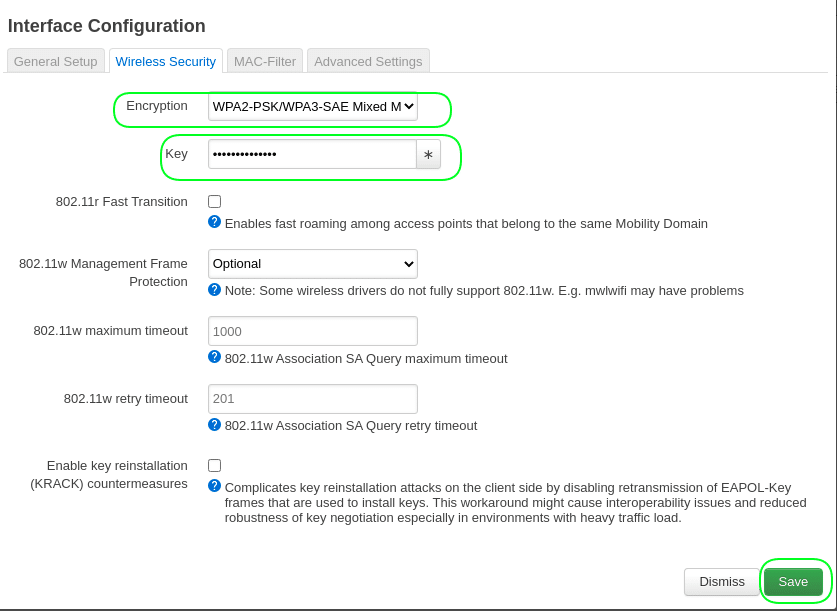
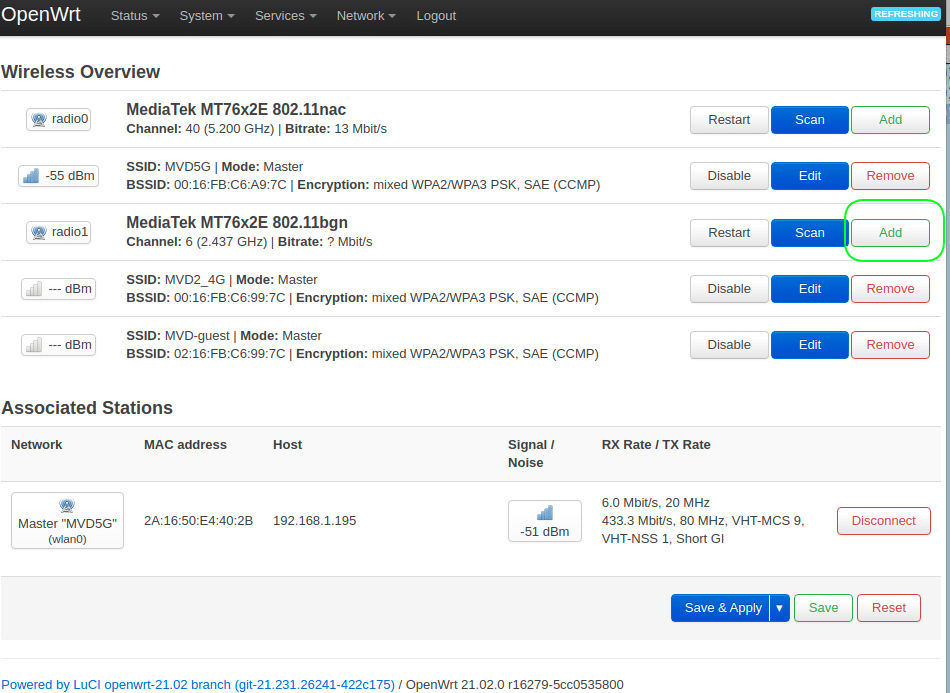
4.2 Click the button “Edit” under “radio1 802.11bgn”.
Channel = Auto
ESSID = your_2.4GHz_wifi_name
Go the tab Wireless Security.
Encryption = WPA2-PSK/WPA3-SAE Mixed Mode
Key = your_2.4GHz_wifi_password
Click the buttons “Enable” (to the left of “Edit”) on both connections.
5. Add guest WiFi.
Taken from here, plus compressed and updated for the new interface.
We do it for 2.4 GHz, but the same can be done for 5 GHz.
5.1 Go to menu Network > Wireless.
5.1.1 Click the button “Add” in “radio1 802.11bgn”.
Channel = Auto
ESSID = your_guest_wifi_name
network = choose "-- custom --" and enter "guest"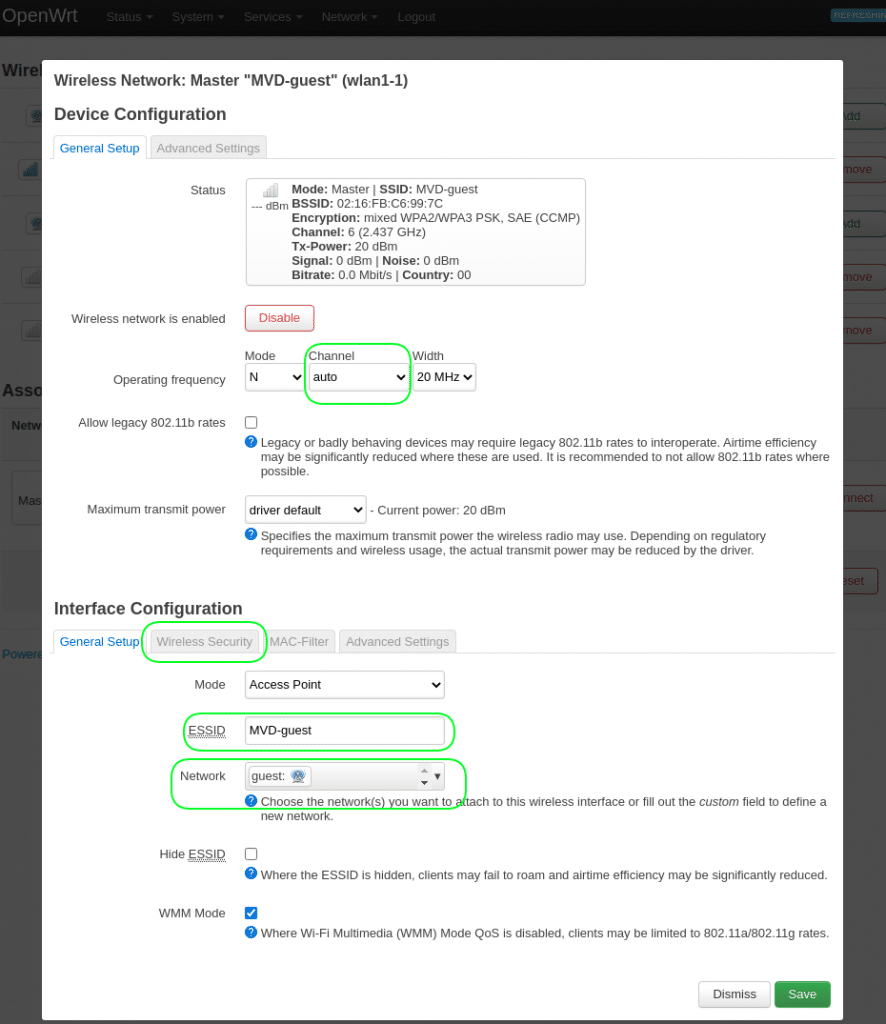
5.1.2 Go the tab Wireless Security.
Encryption = WPA2-PSK/WPA3-SAE Mixed Mode
Key = your_guest_wifi_password
5.2 Go to menu Network > Interfaces.
5.2.1 Click the button “Edit” в интерфейсе “GUEST”.
Protocol=Static address + Click the button “Switch protocol”
IPv4 address = 192.168.3.1
IPv4 netmask = 255.255.255.0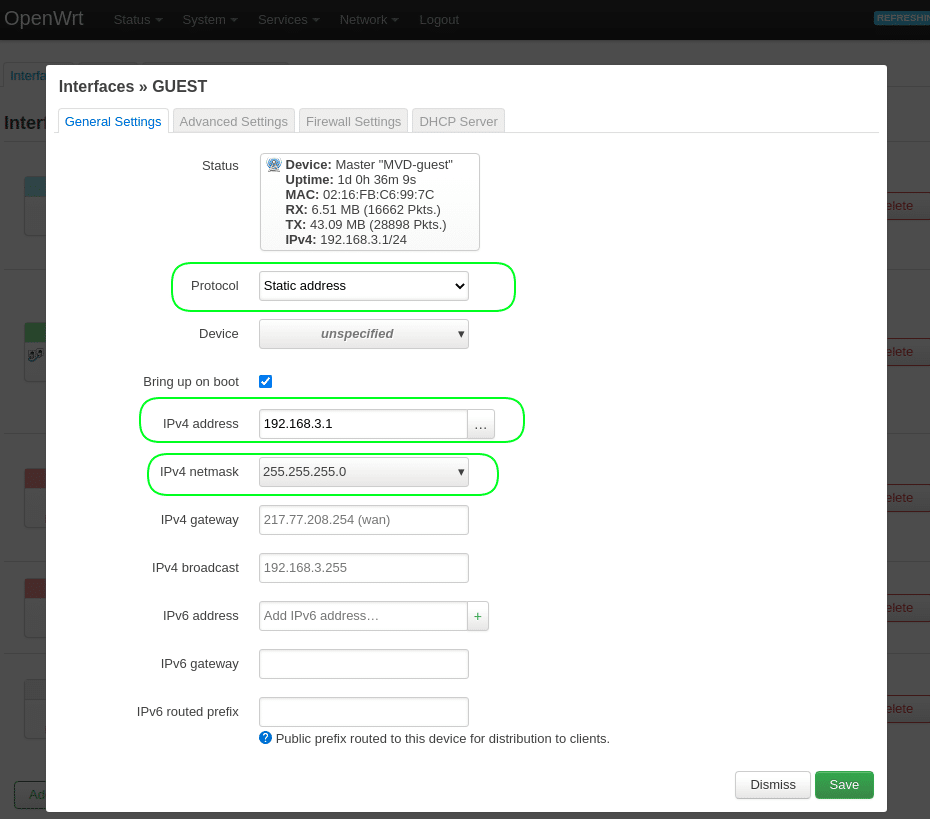
5.2.2 Go the tab “Firewall settings”.
Create / Assign firewall-zone = choose "-- custom --" and enter "guest"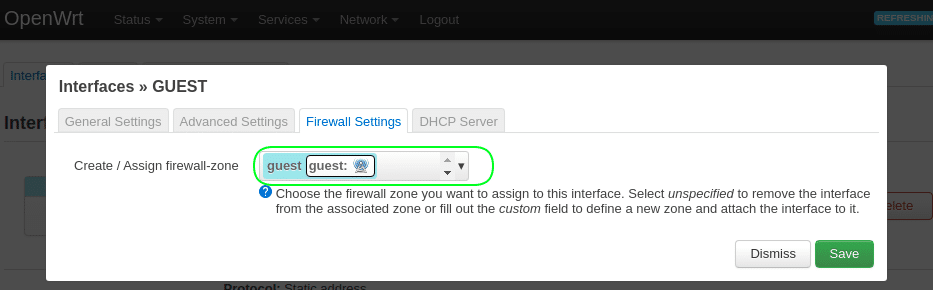
5.2.3 Go the tab “DHCP server”.
Click the button "Setup DHCP server" and then Save5.3 Go to menu Network > Firewall.
5.3.1 Click the button “Edit” in the zone “guest”.
Input = reject
Allow forward to destination zones = WAN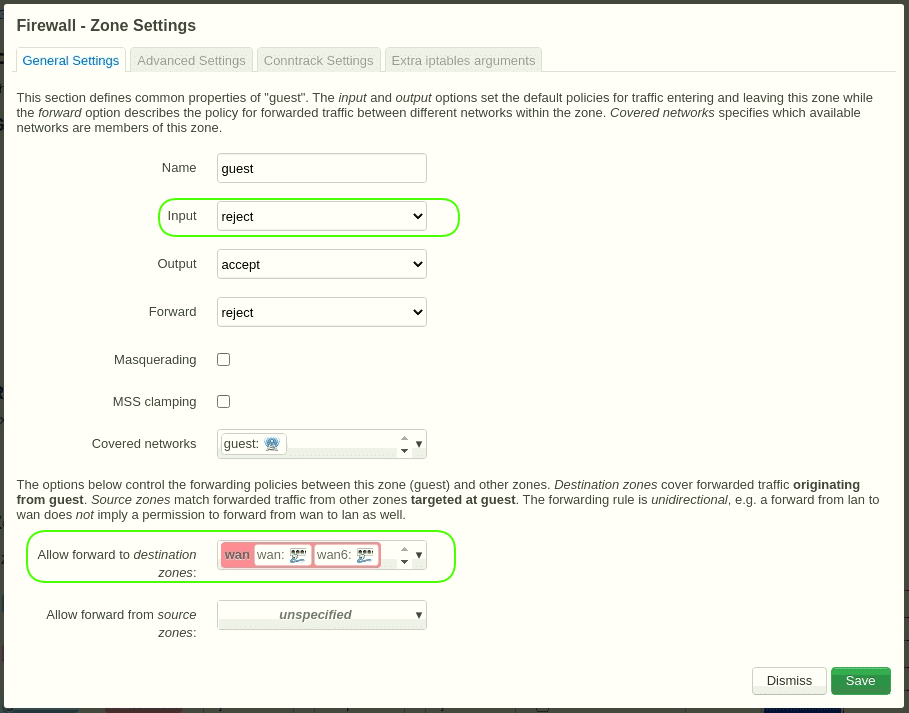
5.3.2 Go the tab Traffic rules.
Click the button “Add” below.
Name = Guest DNS
Protocol = TCP+UDP
Source zone = guest
Destination zone = Device(input)
Destination port = 53
Save
Click the button “Add” below.
Name = Guest DHCP
Protocol = UDP
Source zone = guest
Destination zone = Device(input)
Destination port = 67
Save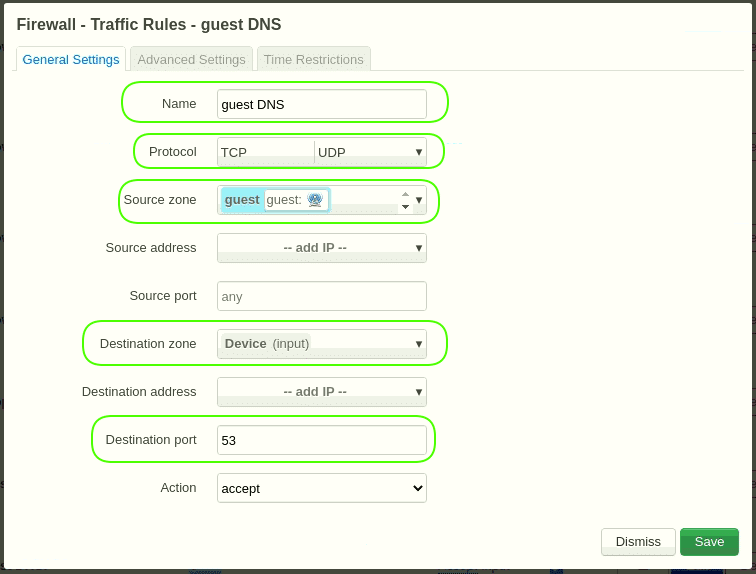
6. Configure dynamic DNS NoIP.
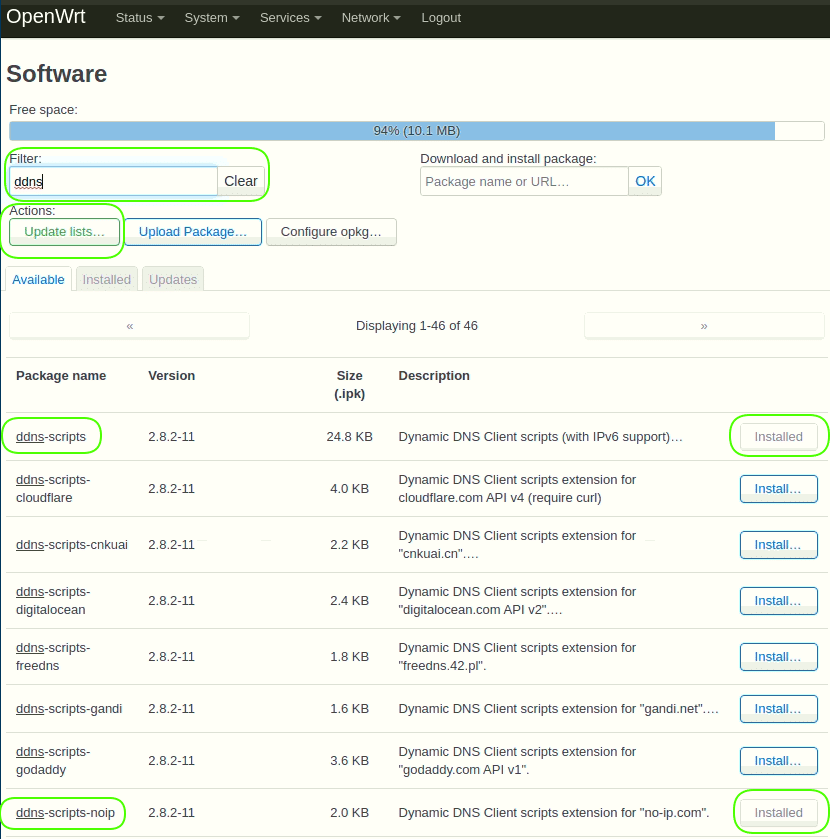
6.1 Go to menu System > Software.
Click the button “Update lists…”
Enter “ddns” in the field “Filter”.
Install packages: “ddns-scripts”, “ddns-scripts-noip”, “luci-app-ddns”.
Logout and login again.
6.2 Go to menu Services > Dynamic DNS.
6.2.1 Click the button “Edit” in the line “myddns_ipv4”.
Lookup Hostname = your.dyndns.domain.com
DDNS Service provider = no-ip.com + Click the button "Switch service"
Domain = your.dyndns.domain.com
Username = your_username
Password = your_password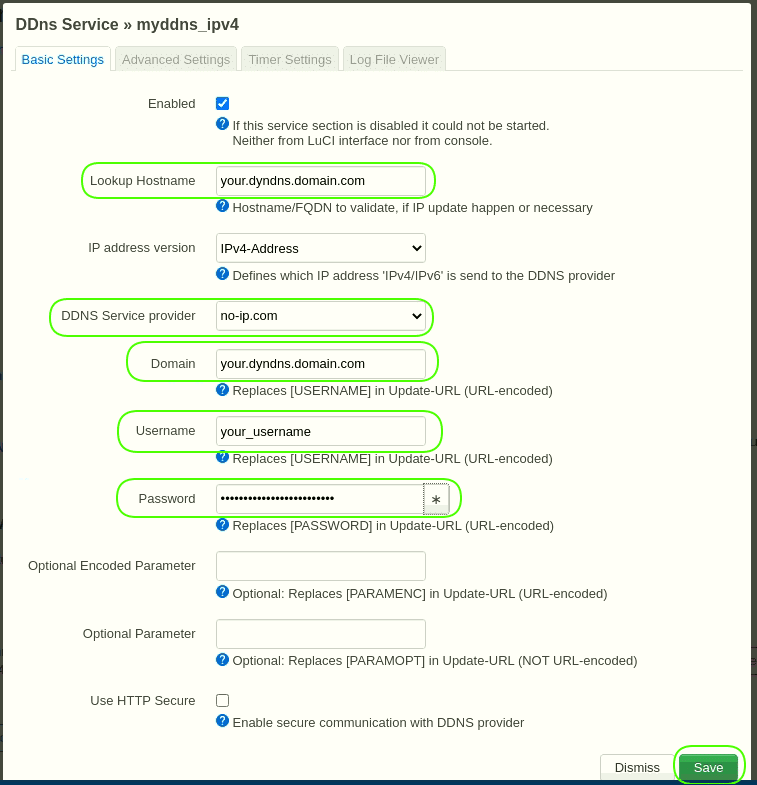
6.2.2 Click the button “Reload” in the line “myddns_ipv4”.
6.2.3 Click the button “Delete” in the line “myddns_ipv6”, if IPv4 is enough for you.
7. Configure port forwarding.
Go to menu Network > Firewall > Port Forwards.
Click the button “Add” below:
Name = SSH
Protocol = TCP+UDP
External port = 22
Internal IP address = 192.168.1.2
Save
Click the button “Add” below:
Name = Anydesk
Protocol = TCP+UDP
External port = 7070
Internal IP address = 192.168.1.2
Save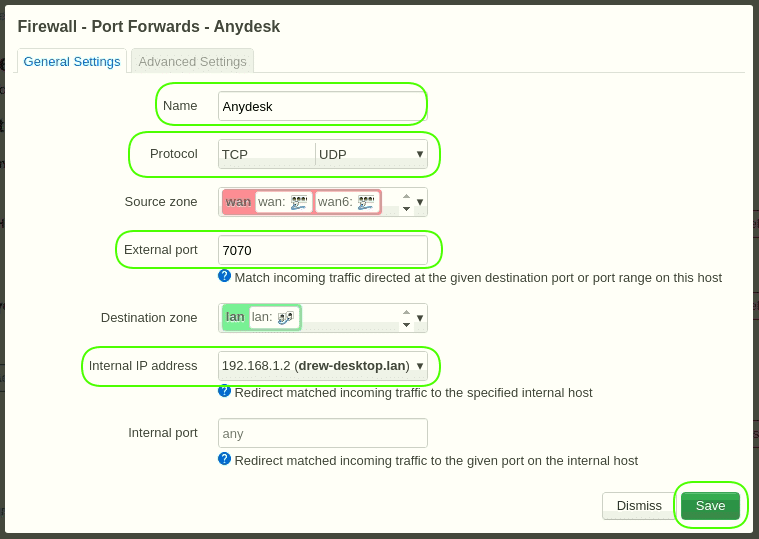
8. Save the configuration to an archive file.
Go to menu System > Backup.
Click the button “Generate archive”.
Save the downloaded file in a secure place.
In this menu item, you can upload firmware updates – the “Flash image …” button.
Conclusion.
We have shown inexpensive measures to improve the security and stability of home routers. At the same time, it should be noted that no one-time security measure, including the purchase of expensive hardware and software, will guarantee the absence of security incidents. If you need a really high level of security, you need a comprehensive systematic approach, starting with the audit of your IT infrastructure, including your home environment.